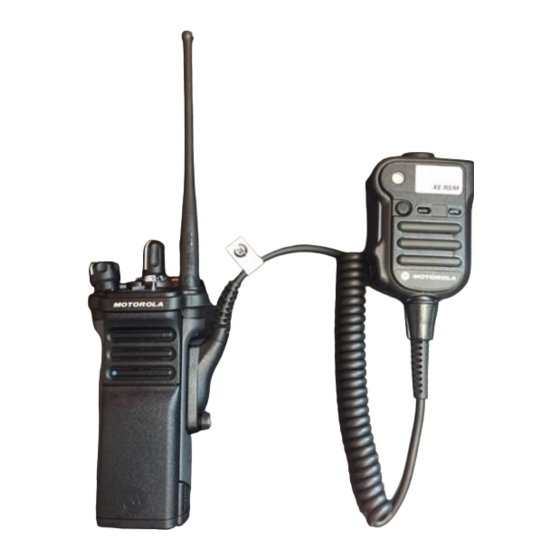
Summary of Contents for Motorola APX 6000 XE
-
Page 1: Radio Overview
MOTOROLA APX 6000 XE RADIO OVERVIEW A basic overview to review the key components of the new radios... - Page 2 Motorola APX 6000 XE with XE- RSM microphone attached Remote Speaker Microphone (RSM) APX 6000 XE RSM IS REQUIRED ON ALL RADIOS ASSIGNED TO BBFR OPERATIONS...
- Page 3 RADIO HIGHLIGHTS Top mount display screen - easily visible while wearing Larger knobs for easier use Larger orange emergency button...
- Page 4 Top mount display Channel Select Group Emergency Select button Volume...
- Page 5 Radio side-view Radio display Illumination/rotation Push-to-talk button To change from groups ABC to DEF and back (bottom button only)
-
Page 6: Group Selection
Group Selection Radio groups can change from A to B to C with selector switch located between the volume and channel selector knobs To get to D, E, or F groups: Press this bottom button n the side of the radio, then rotate the selector switch to the respective group... - Page 7 Display Illumination/Rotation To illuminate the radio display, press this button on the side of your radio. To rotate your display view, press and hold this button on the side of your radio.
-
Page 8: Removing The Battery
Removing the battery To remove the battery: 1) squeeze the battery on both sides, where the yellow arrows are pointing 2) slide the battery in the direction of the green arrow. - Page 9 XE-RSM MICROPHONE HIGHLIGHTS 2-microphone design to cancel out background noise Easily accessible with bulky gloves Protected buttons to prevent accidentals Prominent Push-To-Talk Button...
- Page 10 Large orange emergency button with strobe light activation Built-in flashlight Large Volume Switch – 50% louder – ramp up volume One inch reflective tape SEE USER GUIDE FOR MORE DETAILS...
- Page 11 RSM Features Emergency Button Reflective Tape Flashlight/Emergency Strobe light Turns on flashlight Dual Microphones...
- Page 12 RSM Features Volume Illumination/ Rotation P-T-T...
- Page 13 Overview of Radio Channels Radios groups/channels have been pre-programmed but are subject to change over time. The following radio groups/channels are at time of issue in August, 2016.
- Page 14 A-Channels A1- Fire Main A9- LIFEGRD A2- TAC 2 A10 –CALL A3- TAC 3 A11- COM1 A4- TAC 4 A12- COM 2 A5- TAC 5 A13- COM3 A6- TRAINING A14- COM4 A7- LIFE SAFETY A15- COM5 A8- ORPD A16- HAWK...
- Page 15 B- Channels B1- MEDCTR B9- WRMC B2- MEDCTR2 B10- LIFEGRD B3- BMH B11- BB ALL 1 B4- JFK B12- BB ALL 2 B5- DMC B13- BBPD 1 B6- BOCA B14- TAC2 B7- MARY B15- DYN B8- BWH B16- LOC...
- Page 16 C-Channels C1- EOC C9- 8TAC94 C2- EM COM2 C10- MA FLAR C3- EM COM3 C11- LE COM1 C4- EM CALL C12- LE COM 2 C5- 8CALL90 C13- LE COM3 C6- 8TAC91 C14- LE COM4 C7-8TAC92 C15- LE COM5 C8- 8TAC93 C16- LE CALL...
- Page 17 D-Channels D1- SOUTHHUB D9- 8TAC94 D2- SHUBFR D3- SHUBALL D4- SHUBLIF D5- 8CALL90 D6- 8TAC91 D7- 8TAC92 D8-8TAC93...
- Page 18 E-Channels E1- PWMAIN E9- UTMRS E2- FACMGT E10- UTADMIN E3- FACLTY E11- BLDG E4- TRANSP E12- DEVELP E5- PWSW E13- ENGIN E6- STRTS E14- WHSE E7- FLTMGT E8- UTPR...
- Page 19 F-Channels F1- LE-COM1E F9- REC 2 F2- LE-COM2E F10- REC 3 F3- LE-COM3E F11- LIFEGD F4- LE-COM4E F12- ADMIN F5- LE-COM5E F13- ALL1 F6- PARKS F14- ALL2 F7- PKIRG F8- REC 1...


