Table of Contents
Advertisement
Quick Links
1. Controller accessories
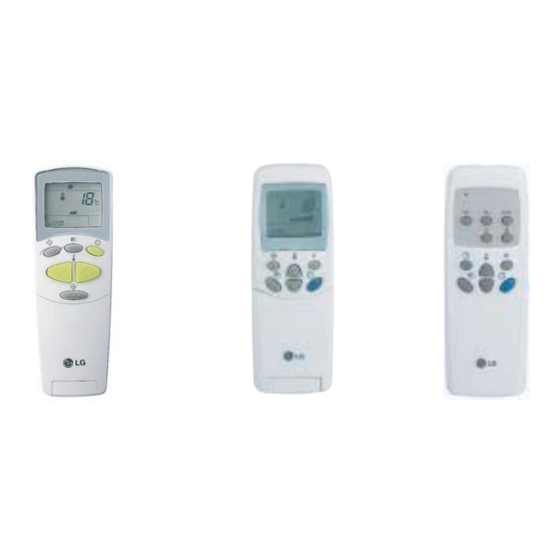
1.1 Wireless remote controller
Picture:
Functions:
A Wireless remote controller allows the operation of air conditioner from any corner of the room
Functions
Air circulation / Fan operation
Room temperature checking
Sleep mode operation
Temperature settings
Operation mode selection
Air-swing & Jet cool (Cassette Only)
On/Off Timer settings
Applicable Models:
Ceiling cassete
Ceiling concealed duct
Accessory:
Wireless remote control ............................................................................................................................1EA
Owner's manual ........................................................................................................................................1EA
Controller accessories
PQWRHSF0
PQWRHSF0
AHWRHD
AHWRHD
Wireless remote controller
AHWRHS
AHWRHS
363
Advertisement
Table of Contents

Summary of Contents for LG PQWRHSF0
-
Page 1: Wireless Remote Controller
Wireless remote controller 1. Controller accessories 1.1 Wireless remote controller Picture: PQWRHSF0 AHWRHD AHWRHS Functions: A Wireless remote controller allows the operation of air conditioner from any corner of the room Functions PQWRHSF0 AHWRHD AHWRHS Air circulation / Fan operation... -
Page 2: Installation Procedure
Wireless remote controller Installation procedure: Mounting on the wall 1) Mount the remote control stand on the wall with the help of screw driver and screw pur- chased locally. 2) Insert the remote control in the stand. How to insert batteries: 1) Remove the battery cover from the remote control. -
Page 3: Operation Mode
Wireless remote controller Function's detail Models : PQWRHSF0 The remote control transmits the signals to the system. Signal transmitter START/STOP BUTTON Operation starts when this button is pressed and stops when the button is pressed again. Operation mode selection button Used to select the operation mode. - Page 4 Wireless remote controller Models : AHWRHD 1. Operation display Displays the operation conditions. Signal transmitter 2. Start/Stop button Operation starts when this button is pressed and stops when the button is pressed again. 3. Operation mode selection button Used to select the operation mode. 4.
- Page 5 Wireless remote controller Models : AHWRHS Signal transmitter 1. FAN operation button Used to circulate room air without cooling or heating. Transmits the signals to the signal receptor. 2. Cooling operation button 3. Soft dry operation button Used to dehumidify without overcooling. 4.
-
Page 6: Simple Wired Remote Controller
Simple wired remote control 1.2 Simple wired remote controller Models : PQRCUCA0 Picture: Functional description: 1. Simple design. 2. Simple & easy use. 3. Memorize data(operation data) in case of power failure. 4. ON/OFF , Temperature setting, room temperature display, Air flow control, lock setting, Fault diagnosis function, operation mode setting, basic functions. -
Page 7: Installation Method
Simple wired remote control Installation method: 1 Put the installation paper on the place and determine the position and height of the fixing screws of the wired remote con- troller. • Refer to the printed side of the installation paper. The position of the fixing screws 2 Plug the connecting cable into the indoor unit. -
Page 8: Deluxe Wired Remote Controller
Deluxe wired remote controller 1.3 Deluxe wired remote controller Models : PQRCUDS0 Picture: Functional Description: 1. Big LCD panel which can display various information. 2. Deluxe touch panel. 3. Memorize data(operation data) in case of power failure. 4. ON/OFF,Temperature setting, room temperature display, 5. - Page 9 Deluxe wired remote controller Installation method: 1 Put the installation paper on the place and determine the position and height of the fixing screws of the wired remote con- troller. • Refer to the printed side of the installation paper. The position of the fixing screws 2 Plug the connecting cable into the indoor unit.
- Page 10 Hotel use remote controller 1.4 Hotel use remote controller Models : PQRCFCS0 Picture: Functional description: Can control one or multi indoor units which have been installed at remote areas with same function by same con- troller at same time 1. Simple design. 2.
-
Page 11: Operation
Hotel use remote controller Dimension 70mm PQRCHCS0 Defrost Preheat Out door Room Temp Total on Central Run Cooling Heating Auto Dry Fan MODE SPEED 13.5mm Operation 1. LCD Panel to show various information. 2. Can check indoor operation status by Key. 3. -
Page 12: Zone Control
Zone Control 1.5 Zone Control Models : ABZCA Picture Functional Description: 1) Operation Summary A device which senses temperature of each zone controls ROOM1 Thermostat ROOM2 Thermostat operation of each diffuser,so temperature of each zone can be controlled. 2) Specific Operation Damper Motor Damper Motor - If every zone (diffuser) is closed, Comp and outer fan... - Page 13 Zone Control Installation method: • Connect main lead wires between main PCB and Zone Control. • Connect thermostat to Zone Control according to thermostat maker's manuals. • Connect Damper Motor to Zone Control according to Damper Motor maker's manuals. • Wiring also depends upon the type of the damper actuators. •...
-
Page 14: Wiring Diagram
Zone Control Installation Procedure: • The control should be mounted to control panel using 4 screws supplied. • Fasten it to any holes on control panel as long as there is enough space to install. If necessary drill holes to install on prop- er position. - Page 15 • LGAP application models Installation Procedure: Installation steps for single product 1 . Connect CN-CC with Main PCB by the cable(provided) - Connection of Dry contact only - Connection of Dry contact & LG Central Controller DRY CONTACT Connection PCB SUB PCB (6871A30056A)
-
Page 16: Automatic Mode
Dry contact module Installation steps for muiti product 1 . Connect CN_DRY with Control Unit . (Fix SUB PCB into the proper location.) - To apply power source from the outside - To apply power source through PCB DRY CONTACT DRY CONTACT SUB PCB SUB PCB...


