Sign In
Upload
Manuals
Brands
Miele Manuals
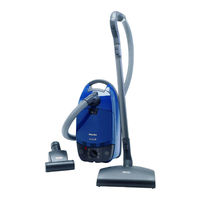
Vacuum Cleaner
S516
Miele S516 Manuals
Manuals and User Guides for Miele S516. We have
2
Miele S516 manuals available for free PDF download: Technical Information, Operating Instructions Manual
Miele S516 Technical Information (65 pages)
Brand:
Miele
| Category:
Vacuum Cleaner
| Size: 2.94 MB
Table of Contents
Table of Contents
2
Warning and Safety Instructions
6
General Information
6
Cleaning and Care
6
Vacuums and Accessories
6
Dust Compartment
6
Modification History
7
Technical Data
7
Table C-1: S 51X, S 52X and S 53X Data Sheet
8
Table C-2: S 54X, S 55X, S 62X and S 65X Data Sheet
10
D Layout of Electrical Components
11
51X Models
11
Figure D-1: S 51X Component Layout
11
52X and S 53X Models
12
Figure D-2: S 52X and S 53X Component Layout
12
54X and S 55X Models
13
Figure D-3: S 54X and S 55X Component Layout
13
62X Models
14
Figure D-4: S 62X Component Layout
14
65X Models
15
Accessories
15
Figure D-5: S 65X Component Layout
15
Figure D-6: Accessories
15
Accessory Holder
16
Figure D-7: Accessory Holder
16
010 Casing Bottom
17
Function
18
Dustbags
18
Filters
18
Figure 010-1: Overheat Indicator
18
Figure 010-2: Filter Types
18
Service
19
Storage Slot Removal
19
Bumper Strip Removal
19
Seal and Sealing Ring Removal
19
Figure 010-3: Storage Slot Removal
19
Caster Removal
20
Figure 010-4: Seal and Sealing Ring Removal
20
Figure 010-5: Levering out the Support Roller
20
Bag Holder Removal
21
Figure 010-6: Bag Holder Removal
21
Figure 010-7: Spring Position
21
Changing the Bag
22
Replacing the Super Air Clean Filter
22
Replacing the Active Air Clean or Active HEPA Filter
22
Figure 010-8: Changing the Bag
22
Figure 010-9: Replacing the Super Air Clean Filter
22
Replacing One Type of Filter with Another
23
Changing the Dust Compartment (Motor Protection) Filter
23
Figure 010-10: Replacing the Active Air Clean or Active HEPA Filter
23
Figure 010-11: Removing/Inserting Grill
23
Vacuum Pressure Monitor Removal
24
Figure 010-12: Changing the Dust Compartment Filter
24
Figure 010-13: Vacuum Pressure Monitor Removal
24
020 Casing Top
25
Fault Repair
26
Bag Change Indicator Reacts too Late
26
Bag Change Indicator Reacts too Early
26
Figure 020-1: Turning the Adjustment Screw Clockwise
26
Accessory Compartment Lid Difficult to Close
27
Accessory Compartment Lid Difficult to Open
27
Figure 020-2: Turning the Adjustment Screw Counterclockwise
27
Accessory Compartment Lid Rocks Back and Forth
28
Service
28
Accessory Compartment Lid Removal
28
Figure 020-3: Shortening the Lid Catch Lugs
28
Casing Top Removal
29
Figure 020-4: Accessory Compartment Lid Removal
29
Figure 020-5: Casing Top Removal
29
Casing Top Installation
30
Casing Top Replacement
30
Figure 020-6: Casing Top Installation
30
Cover Frame Removal
31
Bag Change Indicator Removal
31
Figure 020-7: Cover Frame Screws
31
Slide Sleeve and Dust Channel Removal
32
Figure 020-8: Dust Channel Holder Screws
32
Slide Sleeve and Dust Channel Installation
33
Figure 020-9: Connection Piece Removal
33
Figure 020-10: Slide Sleeve and Dust Channel Pre-Assembly
34
Figure 020-11: Slide Sleeve and Dust Channel Installation
34
Slide Shutter Replacement
35
Casing Top Catch Removal (S 500 Models)
35
Casing Top Catch Removal (S 600 Models)
35
Figure 020-12: Bending the Slide Shutter
35
Figure 020-13: Installing the Slide Shutter
35
Casing Top Catch Installation (S 500 Models)
36
Casing Top Catch Installation (S 600 Models)
36
Figure 020-14: Releasing the Catch
36
Figure 020-15: Spring Position (S 500 Models)
36
Built-In Socket Removal
37
Figure 020-16: Spring Position (S 600 Models)
37
Figure 020-17: Cover Strip Removal
37
Figure 020-18: Removing the Cover Strip from Its Guide
38
Figure 020-19: Hinge Removal
38
Figure 020-20: Cord Guide with Cover Removal
39
Figure 020-21: Hinge Removal through Casing Top Opening
39
Built-In Socket Installation
40
Figure 020-22: Built-In Socket Installation
40
Figure 020-23: Slide Sleeve Installation
40
Figure 020-24: Install the Cover on the Cord Guide
41
Figure 020-25: Laying the Wires in the Cord Guide
41
030 Operating Unit
42
Fault Repair
43
Vacuum Cleaner Cannot be Switched on
43
Vacuum Cleaner Shuts Itself off or Overheating Indicator LED Lights up
43
Fuse Trips
44
Cord Is Not Fully Rewound
44
Autoreverse Slide Blocked
44
Electronics Troubleshooting
45
Figure 030-1: Electronic Connections
46
Figure 030-2: Direct-Connect Hose Connection
47
Figure 030-3: Direct-Connect Hinge Connections
47
Figure 030-4: Electronic (Side View)
48
Figure 030-5: Electronic (Top View)
48
Service
49
Cap Removal
49
Cap Installation
49
Figure 030-6: Cap Removal
49
Figure 030-7: Cap Installation
49
Cord Reel Removal
50
Cord Removal
50
Figure 030-8: Cord Reel Removal
50
Figure 030-9: Cord Reel, Unwound
51
Figure 030-10: Cord Reel Clamped to Reel Assembly Body
51
Figure 030-11: Screws Securing Cord Reel
51
On/Off Switch Removal
52
Foot Switch Removal
52
Figure 030-12: Cord Reel Tabs
52
Plug Housing Removal
53
Figure 030-13: Levering out the Foot Switch
53
Figure 030-14: Plug Housing Removal
53
Potentiometer (and Indicator Light) Removal (S 51X)
54
Figure 030-15: Potentiometer & Indicator Light Removal (S 51X)
54
Figure 030-16: Plug Housing (S51X)
54
Potentiometer and Indicator Light Removal (S 52X, S 62X)
55
Figure 030-17: Indicator Light and Bracket (S 52X, S 62X)
55
Gear Rack Removal and Installation (S 52X, S 62X)
56
Figure 030-18: Plug Housing (S 52X, S 62X)
56
Figure 030-19: Position of Gear Rack and Cog Wheel (S 52X, S 62X)
56
Park System Switch Removal
57
Cap Electronic Replacement
57
Figure 030-20: Gear Rack Removal (S 52X, S 62X)
57
Figure 030-21: Park System Switch Removal
57
040 Motor
58
Service
59
Motor Removal
59
Damping Plate Removal
59
Carbon Brush Removal
59
Figure 040-1: Motor Removal
59
Motor Electronic Replacement
60
Figure 040-2: Carbon Brushes and Electronic
60
050 Suction Hose
61
Fault Repair
62
Suction Power Is too Low
62
Elbow Not Seated Correctly in the Suction Opening
62
Elbow Blocked
62
055 Electro Suction Hose
63
Fault Repair
64
Suction Power Is too Low
64
Elbow Not Seated Correctly in the Suction Opening
64
Elbow Blocked
64
Appliance Always Operates at Full Power
64
Appliance Cannot be Switched on
65
Power Level Cannot be Adjusted
65
Electrobrush Cannot be Selected
65
Service
65
Replacing the Suction Hose with Electronic
65
Advertisement
Miele S516 Operating Instructions Manual (44 pages)
Miele S516: User Guide
Brand:
Miele
| Category:
Vacuum Cleaner
| Size: 1.97 MB
Table of Contents
Operating Instructions
1
Vacuum Cleaner
1
Table of Contents
3
Important Safety Instructions
4
Using Accessories
6
Guide to the Vacuum Cleaner
8
Guide to the Vacuum Cleaner
9
Before Using for the First Time
10
Adjusting the Telescopic Wand
11
Included Accessories
13
Using the Included Accessories
15
Crevice Nozzle
15
Dusting Brush
16
Upholstery Nozzle
16
Operation
17
Power Cord
17
Turning the Vacuum on and off
18
Adjusting the Suction
19
Blower Connection Socket
21
Transportation and Storage
22
Maintenance and Care
23
Purchasing New Dustbags and Filters
23
Which Dustbags and Filters Are the Right Ones
23
When to Change the Dustbag
24
Replacing the Dustbag
25
Replacing the Exhaust Filter
26
Replacing the "Air Clean" Filter
27
Replacing the "Active Air Clean" Filter and the "Active HEPA" Filter
28
Replacing One Type of Filter with Another
29
When to Change the Dust Compartment Filter (Motor Protection)
30
Replacing the Dust Compartment Filter (Motor Protection)
30
When to Change the Thread Catcher Pads
31
Cleaning and Care
32
Technical Service
33
Optional Accessories
34
Caring for the Environment
40
Advertisement
Related Products
Miele S 518
Miele S 514
Miele S 5981 PowerPlus
Miele S 5281 MedicAir
Miele S 500 Series
Miele S 548
Miele S 5001
Miele S 5781 TotalCare
Miele S 5781
Miele S 5261
Miele Categories
Washer
Dishwasher
Oven
Ventilation Hood
Dryer
More Miele Manuals
Login
Sign In
OR
Sign in with Facebook
Sign in with Google
Upload manual
Upload from disk
Upload from URL